Friday 2 May 2014

Steampunk: Skills 2

as I mentioned in the previous post  I was going to add more detail to the textures of the new warehouse in Ddo below the first two textures are the old ones and the new ones just after our new textures created in Ddo and be rendered screenshot of the new results on the warehouse.


Above is the main default texture that I got  from CG textures this I changed to a 512x512 texture below this texture is not in the standard size but as this is only a one-off structure I believed using it in its default size was the best choice for quality


now here are the new textures from Ddo as you can see the first thing that is clearly obvious is that this release are darker then their previous textures in these textures I added in leaking from rain and insert and dirt gradually wearing down and leaving its own mark for the marble I decided to do the same rain drips texture as on the brick but with this I decided to add  a faint amount of Moss as you can see this is dirtied up the textures making them look more like an old building than a brand-new one


below are two similar images to the ones in the previous post just with the updated textures from Ddo from afar there is not much difference but up close you can see the building looks a lot more realistic and less clean then you would have seen in the previous pictures


Steampunk: Skills

as I've talked in my previous posts about how I feel I am not truly showing my skill so I decided to use what I've learnt over the past year to accumulate this knowledge to show my true potential of modelling. below is a modular did warehouse that I've constructed  using a few modular parts combining them in order to make a large structure that is only using instances to save memory and also using my new and improved texturing skills and also using Ndo and Ddo to its full potential as I have not added  much detail in my buildings in my steam punk environment I'm hoping showing my skill I have now this is what I could have done to the entire environments if I knew what I know now at the beginning of the year.


above and below are the modular parts of the building I was talking about  at the top of the post here are some of the modules constructed in maya below are some of these modules gradually being textured.


below is the full range apart from one or two that I've not constructed yet that will make up this new warehouse my inspiration for this building came mainly from the Victorian inspired architecture of big public buildings hotels and stations by using these modular sections I will be able to build a detailed building but only using a few hundred policies as these modular sections will be instanced saving huge amounts of memory this is one of the other things I have learnt this year is the best thing to do to give great detail to the environment but also save memory so that the frame rate runs above 30 frames a second.


below are two images of the finished product of fees modular departs from the picture above combined to make a new building on what I'm very proud of this building is each module is interchangeable meaning I can add more corner turrets to the side of the building if I so wished or increase the width of the building on the right-hand side or adding more vertical pillars that is a separate object in order to add more detail.


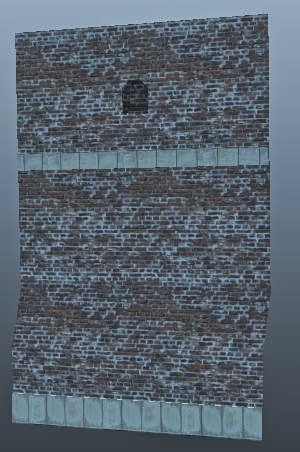
Below is a close-up of the modular sections of the building as you can see I have used softon edge tool and Beverley in order to give the building in real organic flow of light around the edges and this time really looking into the normal map and spectator map to really give the detailed building deserves the normal maps on the building are a bit over exaggerated as Maya tends to do this.


Criticism: the problems so far with this model is that it is to clean in order to sort this out I am going to start using some of the textures in Ddo by using its tools I will make the marble look more like marble and the brick  more like brick as these tools can really bring out detail and make the text extremely real are using this software I believe this model will be one of the best  buildings I've constructed for my steam punk environment.


Thursday 1 May 2014

Steampunk: Refining

Bevelling

Below I have been added bevel's to some of my buildings to help with the light mapping and not having harsh edges has helped speaking to Dan from born ready games he mentioned how many harsh edges there were in the environment and saying that Beveling could really help the environment and when I like map the light wouldn't suddenly end on a harsh edge but gradually curve around it with the sort of afterglow as you can see below adding this bevel has gotten rid of the harsh edges and has added more detail to the environment and makes it look more real unfortunately I don't think I'll have time to bevel everything in the environment but if I'd have done this for all my models I think my environmentcould have been that little better


Wednesday 30 April 2014

Steampunk: Finishing (NOTE)

after having a think about the environment I will now focus my time on impoveing the models by added in bevels and updating the textures also to show that i can so something to a high standered i will take some of the assets and improve on them and update there textures as i now start to reflect on the environment i have done lots of models to low stranded and not doing enough high stranded models when i should have met in the middle with a smaller environment with more detailed assets, looking at what i have leaned from this experience i can improve and show i can make low-poly models with lots of detail over the summer iam going to remake this to a higher started as when i look at the environment i feel that i am not showing my paternal of being a good environment artiest and as the deadline comes closer i look at the scene with a ever decreasing standerd

So far with this project I have just been making as many assets and models as I can but when I was generating specular maps or normal maps I just used the default normal maps and specular that were generated by crazy bump or Ndo I do really take time and look at what this bump map or Spectrum was for was it for varnished wood was it further unvarnished wood was it for metal was for rusty metal and now looking back at the model this an attention to detail I believe has made the environment suffer.

Also with the amount of detail that I would have liked to have gone into by adding rubbish and dirt a lot more details into the environment to really add the sense that it's been lived in this is another thing I didn't really pay much attention to their are one or two decals here and there but in all fairness on my part I didn't spend much time on them one of the biggest flaws I think with this project was me over sizing the environment when I probably should have redesigned the layout as I did it kept it a similar size to my previous environment for steampunk this I think I could have then showed off my skills and my attention to detail instead of over reaching myself and causing my environments detail to suffer I have been trying to update some of the models and make them look better but unfortunately I think this is a little too late

I don't know if this is just me having stared at this project for every year now and slowly criticising it and becoming more and more critical of the environment this project has taught me a lot about how I should of spend my time concentrating little more on the smaller details instead of looking at the big picture as I have now added so much to this new environment that it is almost too crowded and some of the Vistas that I had planned and now blocked by smoke and big metal cranes and towers also probably choosing the time of day being midday but as it is so polluted its almost dark now looking at this I believe I should have just made a nice sunny day on the seaside as this would have been able to event shown off perspective maps in great detail instead of only occasionally seeing specular from an object near a light.

Steampunk: Pub (Update)

Here I have changed the textures of the pub and added in a new roof this I did because i felt that the image most people have of a pub it will have a roof on it.


as you can see from the picture above added the roof this has given the pub more style to it. as I said in one of my previous posts about the pub looking to 60s-ish from changing the textures to a dirtier more ruined look I feel also from the pipe work that I've added around the pub has dulled down this fact and I believe the pub now sits more in the environment than it previously did


Tuesday 29 April 2014

Steampunk: Texture Finishing (Ships)

Below I was finishing off the texturing of the boats and making some changes to them what I'm very good at doing is building a model and half finishing it I built this model well over six months ago and I still had not finished texturing it or adding in new parts finally I have decided to sort this out and I will be updating most of the models I have not finished to try and bring them up to standard using what I've learnt over the past six months I hope I can now make these models look better than they previously did

 this post is mainly containing the two vessels that will be in the docks the one directly below is my canal barge and the other vessel at the bottom is my short of paddle steamer which I kind of had the idea of it being a tug boat I hope that adding in these boats will bring more life to my environment and just add that little more detail and by updating the textures and re-mapping I hope they will sit better in the environment than they previously did

 here i made a hole into the boat so that the paddle goes though the boat and makes it more realistic
 I have still not done the cargo hold of the boat this I can finish off with a basic wood texture.
 and also i textured the main paddle of the boat at the back with metal texture

Below is my newest ship that i made and here i have added more detail and fixed some of the textures


Monday 28 April 2014

Steampunk: Telegraph Pole

Below I started to make a Telegraph Pole


Steampunk: Placing

today I meanly placed assets around the environment to add detail to the environment


Steampunk: Valt Wall

Below I derided to finish off the vaulted warehouse and add its own walls to it as you can see I was using the same textures as the pilers blow is a few shorts of the wall and its final place in unity at the bottom of the post. in the unity environment I have been using the model of the walls I've made as a way of stopping the player falling out of the world as I'm now finishing off the environment by closing off gaps I thought best to finish off the Volta walls which I had not done as you can see below is my stage by stage of the wall and gradual integration as I mentioned above immunity.


Steampunk: Ship

As so far I had only the canal barge in my environment I thought it would be best to add some more verity to the scene using one of the drawings i did some time ago in the old post I used this as a platform to design this ship

Below I started to look at the hull of the ship starting of with a cylinder and started to curves to make the hull as you can see below


Below I started to look at the cover that will go over the paddle and the small parts that will make up the paddle.


Below I have made the paddle and added it to both sides


Below is the first finished ship with the basic layout and design of what i will like the ship to look like


after I finished the first ship I started to add more detail and adding the two funnels like the Mississippi paddle steamer and pointed the bow of the ship and as you can see I think this make the ship look a lot more steampunk than the other version I did.


Below i added some basic texturing to see what it would look like i will work out the colours and style later.


Sunday 27 April 2014

Steampunk: Pulley

the link for the skyline to the cable would need to be and interesting design the idea I had in my head but i still uesd the images below as reference


Below using the idea in my head and using the images above I began to make the pulley as you can see i started with the wheel and then went on make other small parts and then went on to put these together to make the final Pulley.


Below is the final pulley that will make up the skyline.


below is it in unity


Below I have added in the hanging box's from the skyline.