I have made the build for the final game which will be on the hand-in CD this file contains three scenes 0 is the main menu 1 one is the steam punk world with the normal character controller unit and number 2 is the same environment but with an oculus rift character controller both of fees scenes are accessible through the main menu screen which has been updated below and now contains code that allows the player to choose each environment and when in the environment have no mouse visible onscreen and be able to exit the game by simply pressing escape.
i have also made a icon file for the game which you can see below this is an icon file and can be added as shown below.
this was not a need asset in the final game I just thought it would be a nice touch to the game folder by having this icon over it instead of the normal default file picture as you can see below this is implemented on the actual physical steam game folder with the EXE and the data file inside of it.
Below are the three code scripts that allow what I discussed above to function in the game
// This simple script below centres the mouse cursor and also makes it invisible in the game build which helps immerse the player instead of having a mouse pointer hovering in the centre of the screen
#pragma strict
function Start () {
Screen.lockCursor = true;
}
function Update()
{
}
also when the mouse is invisible which this code above has inflicted on the game it is now impossible to escape again without doing control alt delete sub by adding this simple code below where you press escape it the game will exit
using UnityEngine;
using System.Collections;
public class Escape : MonoBehaviour {
// Use this for initialization
void Start () {
}
// Update is called once per frame
void FixedUpdate () {
if(Input.GetKeyDown (KeyCode.Escape))
{
Application.Quit ();
}
}
}
below is the main manu script that allows the play the normal game the play the oculus and exit the game using this code below
var isQuit=false;
function OnMouseEnter(){
//change text color
renderer.material.color=Color.red;
}
function OnMouseExit(){
//change text color
renderer.material.color=Color.white;
}
function OnMouseUp(){
if(this.gameObject.name=="GUIPlay")
{
Application.LoadLevel(1);
}
if(this.gameObject.name=="GUIPlayOcc")
{
Application.LoadLevel(2);
}
if(this.gameObject.name=="GUIExit")
{
Application.Quit();
}
}
Showing posts with label 3D. Show all posts
Tuesday, 6 May 2014
Steampuck: Frame Rate (update)
i have managed to fix the frame rate by adding a fog and changing the render distance to just beyond the fog so the player can not see as far as i would like but this makes the game playable
its now running at a steady 30 frames a second which is what i was aiming for.
Monday, 5 May 2014
Steampunk: Game Menu (Update)
Here i have been flowing atutorial on how to make a game menu following this step-by-step videoand using the code provided below I use this and implemented it in my main menu for the game environment in his he only has two start and except but from my ninth hoping to add a fly through option which will allow the player to be on a fixed path and see parts of the environment he would not probably find by themselves.
and also using the code below in the game menu
var isQuit=false;
function OnMouseEnter(){
//change text color
renderer.material.color=Color.red;
}
function OnMouseExit(){
//change text color
renderer.material.color=Color.white;
}
function OnMouseUp(){
//is this quit
if (isQuit==true) {
//quit the game
Application.Quit();
}
else {
//load level
Application.LoadLevel(1);
}
}
function Update(){
//quit game if escape key is pressed
if (Input.GetKey(KeyCode.Escape)) { Application.Quit();
}
}
with this code the text colour will change as the mouse hangs over it as u can see in the pictures below.
and also using the code below in the game menu
var isQuit=false;
function OnMouseEnter(){
//change text color
renderer.material.color=Color.red;
}
function OnMouseExit(){
//change text color
renderer.material.color=Color.white;
}
function OnMouseUp(){
//is this quit
if (isQuit==true) {
//quit the game
Application.Quit();
}
else {
//load level
Application.LoadLevel(1);
}
}
function Update(){
//quit game if escape key is pressed
if (Input.GetKey(KeyCode.Escape)) { Application.Quit();
}
}
with this code the text colour will change as the mouse hangs over it as u can see in the pictures below.
Sunday, 4 May 2014
Steampunk: Main Menu
for my game environment even though it isn't a proper game I thought it best have its own in the main menu or title screen, this will also help when it is on show at the exhibition by having a nice interesting main menu instead of just being the player camera has been left by the previous person facing up or down or something inconspicuous to whether players finished they would ex-it and return to the main menu which will help drawing in visitors to the computer below are some screenshots of my final main menu that I designed.
here is below the view of the scene in unity using an orthographic camera I added in the roughly written word play to show where I will have GUI text for the play button as I've not added this into the scene yet what I intend to do when I've finished with the layout of the scene is to bake it so that the title screen looks as real as the environment itself.
Friday, 2 May 2014
Steampunk: Skills 2
as I mentioned in the previous post I was going to add more detail to the textures of the new warehouse in Ddo below the first two textures are the old ones and the new ones just after our new textures created in Ddo and be rendered screenshot of the new results on the warehouse.
Above is the main default texture that I got from CG textures this I changed to a 512x512 texture below this texture is not in the standard size but as this is only a one-off structure I believed using it in its default size was the best choice for quality
now here are the new textures from Ddo as you can see the first thing that is clearly obvious is that this release are darker then their previous textures in these textures I added in leaking from rain and insert and dirt gradually wearing down and leaving its own mark for the marble I decided to do the same rain drips texture as on the brick but with this I decided to add a faint amount of Moss as you can see this is dirtied up the textures making them look more like an old building than a brand-new one
below are two similar images to the ones in the previous post just with the updated textures from Ddo from afar there is not much difference but up close you can see the building looks a lot more realistic and less clean then you would have seen in the previous pictures
Above is the main default texture that I got from CG textures this I changed to a 512x512 texture below this texture is not in the standard size but as this is only a one-off structure I believed using it in its default size was the best choice for quality
now here are the new textures from Ddo as you can see the first thing that is clearly obvious is that this release are darker then their previous textures in these textures I added in leaking from rain and insert and dirt gradually wearing down and leaving its own mark for the marble I decided to do the same rain drips texture as on the brick but with this I decided to add a faint amount of Moss as you can see this is dirtied up the textures making them look more like an old building than a brand-new one
below are two similar images to the ones in the previous post just with the updated textures from Ddo from afar there is not much difference but up close you can see the building looks a lot more realistic and less clean then you would have seen in the previous pictures
Steampunk: Skills
as I've talked in my previous posts about how I feel I am not truly showing my skill so I decided to use what I've learnt over the past year to accumulate this knowledge to show my true potential of modelling. below is a modular did warehouse that I've constructed using a few modular parts combining them in order to make a large structure that is only using instances to save memory and also using my new and improved texturing skills and also using Ndo and Ddo to its full potential as I have not added much detail in my buildings in my steam punk environment I'm hoping showing my skill I have now this is what I could have done to the entire environments if I knew what I know now at the beginning of the year.
above and below are the modular parts of the building I was talking about at the top of the post here are some of the modules constructed in maya below are some of these modules gradually being textured.
below is the full range apart from one or two that I've not constructed yet that will make up this new warehouse my inspiration for this building came mainly from the Victorian inspired architecture of big public buildings hotels and stations by using these modular sections I will be able to build a detailed building but only using a few hundred policies as these modular sections will be instanced saving huge amounts of memory this is one of the other things I have learnt this year is the best thing to do to give great detail to the environment but also save memory so that the frame rate runs above 30 frames a second.
below are two images of the finished product of fees modular departs from the picture above combined to make a new building on what I'm very proud of this building is each module is interchangeable meaning I can add more corner turrets to the side of the building if I so wished or increase the width of the building on the right-hand side or adding more vertical pillars that is a separate object in order to add more detail.
Below is a close-up of the modular sections of the building as you can see I have used softon edge tool and Beverley in order to give the building in real organic flow of light around the edges and this time really looking into the normal map and spectator map to really give the detailed building deserves the normal maps on the building are a bit over exaggerated as Maya tends to do this.
above and below are the modular parts of the building I was talking about at the top of the post here are some of the modules constructed in maya below are some of these modules gradually being textured.
below is the full range apart from one or two that I've not constructed yet that will make up this new warehouse my inspiration for this building came mainly from the Victorian inspired architecture of big public buildings hotels and stations by using these modular sections I will be able to build a detailed building but only using a few hundred policies as these modular sections will be instanced saving huge amounts of memory this is one of the other things I have learnt this year is the best thing to do to give great detail to the environment but also save memory so that the frame rate runs above 30 frames a second.
below are two images of the finished product of fees modular departs from the picture above combined to make a new building on what I'm very proud of this building is each module is interchangeable meaning I can add more corner turrets to the side of the building if I so wished or increase the width of the building on the right-hand side or adding more vertical pillars that is a separate object in order to add more detail.
Below is a close-up of the modular sections of the building as you can see I have used softon edge tool and Beverley in order to give the building in real organic flow of light around the edges and this time really looking into the normal map and spectator map to really give the detailed building deserves the normal maps on the building are a bit over exaggerated as Maya tends to do this.
Criticism: the problems so far with this model is that it is to clean in order to sort this out I am going to start using some of the textures in Ddo by using its tools I will make the marble look more like marble and the brick more like brick as these tools can really bring out detail and make the text extremely real are using this software I believe this model will be one of the best buildings I've constructed for my steam punk environment.
Thursday, 1 May 2014
Steampunk: Refining
Bevelling
Below I have been added bevel's to some of my buildings to help with the light mapping and not having harsh edges has helped speaking to Dan from born ready games he mentioned how many harsh edges there were in the environment and saying that Beveling could really help the environment and when I like map the light wouldn't suddenly end on a harsh edge but gradually curve around it with the sort of afterglow as you can see below adding this bevel has gotten rid of the harsh edges and has added more detail to the environment and makes it look more real unfortunately I don't think I'll have time to bevel everything in the environment but if I'd have done this for all my models I think my environmentcould have been that little better
Wednesday, 30 April 2014
Steampunk: Pub (Update)
Here I have changed the textures of the pub and added in a new roof this I did because i felt that the image most people have of a pub it will have a roof on it.
as you can see from the picture above added the roof this has given the pub more style to it. as I said in one of my previous posts about the pub looking to 60s-ish from changing the textures to a dirtier more ruined look I feel also from the pipe work that I've added around the pub has dulled down this fact and I believe the pub now sits more in the environment than it previously did
Tuesday, 29 April 2014
Steampunk: Texture Finishing (Ships)
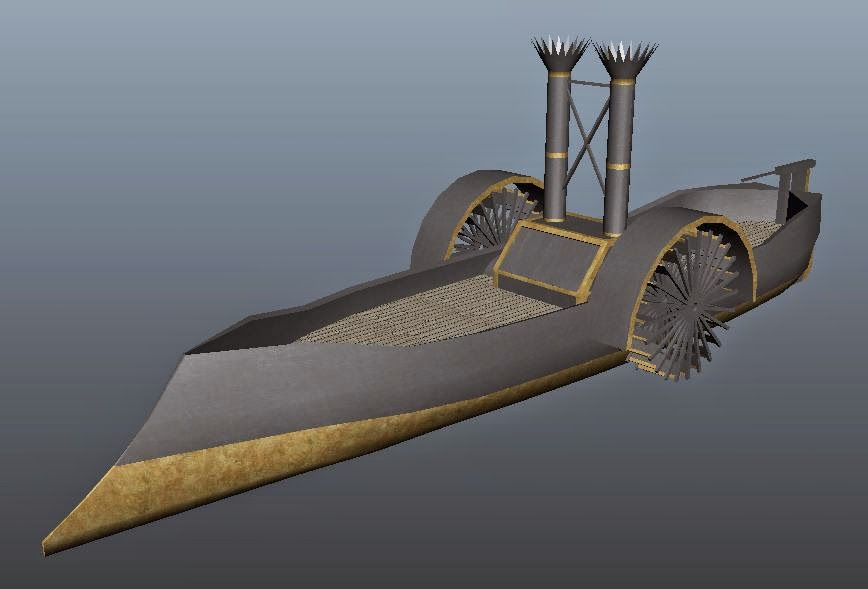
Below I was finishing off the texturing of the boats and making some changes to them what I'm very good at doing is building a model and half finishing it I built this model well over six months ago and I still had not finished texturing it or adding in new parts finally I have decided to sort this out and I will be updating most of the models I have not finished to try and bring them up to standard using what I've learnt over the past six months I hope I can now make these models look better than they previously did
this post is mainly containing the two vessels that will be in the docks the one directly below is my canal barge and the other vessel at the bottom is my short of paddle steamer which I kind of had the idea of it being a tug boat I hope that adding in these boats will bring more life to my environment and just add that little more detail and by updating the textures and re-mapping I hope they will sit better in the environment than they previously did
here i made a hole into the boat so that the paddle goes though the boat and makes it more realistic
I have still not done the cargo hold of the boat this I can finish off with a basic wood texture.
and also i textured the main paddle of the boat at the back with metal texture
Below is my newest ship that i made and here i have added more detail and fixed some of the textures
this post is mainly containing the two vessels that will be in the docks the one directly below is my canal barge and the other vessel at the bottom is my short of paddle steamer which I kind of had the idea of it being a tug boat I hope that adding in these boats will bring more life to my environment and just add that little more detail and by updating the textures and re-mapping I hope they will sit better in the environment than they previously did
here i made a hole into the boat so that the paddle goes though the boat and makes it more realistic
I have still not done the cargo hold of the boat this I can finish off with a basic wood texture.
and also i textured the main paddle of the boat at the back with metal texture
Below is my newest ship that i made and here i have added more detail and fixed some of the textures
Monday, 28 April 2014
Steampunk: Valt Wall
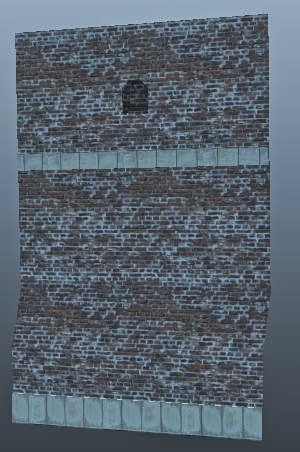
Below I derided to finish off the vaulted warehouse and add its own walls to it as you can see I was using the same textures as the pilers blow is a few shorts of the wall and its final place in unity at the bottom of the post. in the unity environment I have been using the model of the walls I've made as a way of stopping the player falling out of the world as I'm now finishing off the environment by closing off gaps I thought best to finish off the Volta walls which I had not done as you can see below is my stage by stage of the wall and gradual integration as I mentioned above immunity.

Steampunk: Ship
As so far I had only the canal barge in my environment I thought it would be best to add some more verity to the scene using one of the drawings i did some time ago in the old post I used this as a platform to design this ship
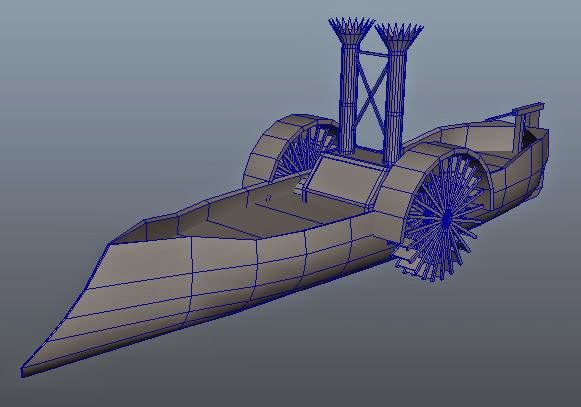
Below I started to look at the hull of the ship starting of with a cylinder and started to curves to make the hull as you can see below
Below I started to look at the cover that will go over the paddle and the small parts that will make up the paddle.
Below I have made the paddle and added it to both sides
Below is the first finished ship with the basic layout and design of what i will like the ship to look like
after I finished the first ship I started to add more detail and adding the two funnels like the Mississippi paddle steamer and pointed the bow of the ship and as you can see I think this make the ship look a lot more steampunk than the other version I did.
Below i added some basic texturing to see what it would look like i will work out the colours and style later.
Below I started to look at the hull of the ship starting of with a cylinder and started to curves to make the hull as you can see below
Below I started to look at the cover that will go over the paddle and the small parts that will make up the paddle.
Below I have made the paddle and added it to both sides
Below is the first finished ship with the basic layout and design of what i will like the ship to look like
after I finished the first ship I started to add more detail and adding the two funnels like the Mississippi paddle steamer and pointed the bow of the ship and as you can see I think this make the ship look a lot more steampunk than the other version I did.
Below i added some basic texturing to see what it would look like i will work out the colours and style later.
Subscribe to:
Posts (Atom)